Thursday, February 21, 2013

Eggplant & Angel Hair Frittata

I found this recipe on the back of one of the BJs Warehouse coupon flyer. For those who are going ‘BJs?” that’s a warehouse type grocery/household/computer store similar to Sam’s and Costco.  By the way I belong to all three.

But there is something different about BJs, at least in my town.  First ALL BJs accept manufacturer coupons!  They also send a coupon book each month and each week have coupon sheets.  Additionally they carry more high-end foodstuffs than our local Sam’s club does.  This allows me to stretch my grocery dollars to include a few special things each payday!  Oh and they take all major credit cards.  So you can guess that I shop there often! 

There are a few things they don’t have at my neighborhood BJs such as rotisserie chicken, but the BJs about 20 miles away does.  And I was NOT happy when they quit carrying really good sourdough bread, instead putting on the shelves a “take and bake” sourdough at twice the price!  This was in the middle of summer!  When I asked why the switch I was told “oh our customers have really been asking for this!”  Yeah, right, like I’ll ask for something that will cost me twice as much and require I finish the baking in the middle of summer!   Thanks for doing that BJs…I now make my own sourdough, so take that!  LOL.  Don’t mess with the Ezzie!

But when I saw this recipe I had to give it a try!   It was easy to do but I should have used a baking spray on my stainless steel skillet, because even with the oil it the frittata stuck!  But that was ok.  I served it to my hubby (who loves pasta with red sauce) and he really liked this.  He only wanted one serving but I found him scraping off the toasty bits from the pan.  See why I said it was ok that it stuck?!  LOL. 

I’ve changed the ingredients just a bit.  For instance the original calls for fresh mozzarella, I didn’t have any.  So I used a shredded mozzarella.  Instead of the BelGioioso Parmigiano-Reggiano, I used BelGioioso Salad Blend which is a blend of shaved cheeses that I love!  The black pepper I replaced with fresh cracked black pepper, always my choice.

I also used only 4 eggplant cutlets and baked them instead of frying or sautéing them.  I hate the mess frying or sautéing makes.  The only reason I used just 4 instead of 8 is because we didn't want more than two of us could eat.  Even with only 4 cutlets, I used the same amount of pasta and eggs, and we still had enough left over for lunch the next day.  

Note:  I forgot to take a picture before serving, so am using the picture from the coupon flyer. 


Serves 6
8 Michael Angelo’s Eggplant Cutlets
4 oz. Barilla Angel hair Pasta, cooked, well-drained
4 large eggs, beaten
Sea Salt
Fresh cracked black pepper
½ c diced fresh mozzarella, or shredded mozzarella or cheese of your choice
3 tbsp. grated BelGioioso Parmigiano-Reggiano or BelGioioso Salad Blend


  • Preheat broiler. Combine eggs and pasta in large bowl and mix well. Season with salt and pepper.
  • Heat 1 Tbsp. oil in large oven-proof skillet over medium-high heat. Sauté cutlets per package directions until tender-crisp. Set aside.
  • Add remaining oil, coating pan thoroughly. Reduce heat to medium and pour in half of pasta-egg mixture. Spread evenly and top with mozzarella, eggplant and remaining pasta-egg mixture.
  • Let cook, occasionally running rubber spatula around edges to prevent sticking, until center is almost set and bottom is golden-brown.
  • Transfer pan to broiler for 1 to 2 minutes to brown top.
  • Sprinkle with Parmigiano-Reggiano. Slice into wedges and serve with soup and salad.

Sunday, February 3, 2013

Spicy Vegetable Soup in the Instant Pot

Baby its cold outside!  I really crave soups this time of year!  I made a good amount of this to take to work during the week, and to share with my neighbors.  I prepared the soup and set it to cook, then took off to the gym.  It was so great to come home to such a heart warming soup on a day that didn't break 30 degrees!    That's the beauty of my Instant Pot 6-in-1 pressure cooker.

I use two kinds of jalapenos, fresh and pickled, because I like to adjust the heat as I am making the soup.  Two jalapenos would have been too much, but with just one the soup needed to have a bit more heat added to it. You can add as many jalapenos as you like.  

I also use two kinds of broth, a low sodium broth by Pacific and 1 quart of broth made from Watkins chicken broth.  The Watkins adds a bit more depth than the Pacific does.  Feel free to use whichever brand you like. 

My neighbors, Wayne and Waneta, to whom I delivered a nice serving of the soup, sent me the following email "What a treat to have our supper delivered to us. The soup was really good & also the bread. It really hit the spot. Thanks again." I had taken them a loaf of my homemade Semolina bread which went perfect with the soup.   

Chop the following vegetables:
1 cup celery (with about an inch of green top part)
1/2 c carrots 
1 medium onion
1 three inch long fresh jalapeno with membrane and seeds removed 

Rest of the ingredients:

2 tbsp. olive oil
1 tsp. coriander seeds
1/2 tsp. cumin seed
3 big russet potatoes cubed but leave the peels on
2 1/2 to 3 quarts Pacific low sodium chicken broth
2 tbsp. Watkins chicken broth 
4 cups of water
1/4 tsp. ground turmeric
1 tsp. ground cumin
2 tbsp. chopped pickled jalapenos

Chopped cilantro to taste (I used half a bunch in this recipe)

Set Instant Pot on Sauté.
Add 2 tbsp. olive oil to pot and let warm up for a minute or so.  Drop in coriander seeds and cumin seeds and heat until the coriander seeds pop. Put in the chopped celery, carrots onion and jalapeno.  Sauté until the onions become translucent, about 5 minutes.

Add in the turmeric, cumin and pickled jalapenos. Once those have released some nice aroma, put in the potatoes and chicken broth.   

Change setting to soup and set for 30 minutes.  Let pressure return to normal. 

Right before serving add in the chopped cilantro. 

Serve with good bread.  

Sunday, January 27, 2013

Trader Joe's Kosher Beef Brisket in Instant Pot (6-in-1 Programmable Pressure Cooker)

Not too long ago my friend Denise brought me a Kosher Brisket from Trader Joe's.  Now kosher brisket is a real treat in my house!  I can't find it in my area for two reasons: no Trader Joe's and no kosher beef in the nearby area.  Trader Joe's is only about 10 minutes from Denise's house, so when she can, she picks one up for me.  Thank you Denise!

Before I go on I am going to put in a disclaimer.  While this recipe calls for Kosher Brisket, the recipe is NOT kosher.  I don't want to go into a lecture on keeping the Jewish Kashrut (kosher) laws, because it can lead to a long dissertation.  Just take a look at this Wikipedia link to get an idea:  http://en.wikipedia.org/wiki/Kosher_foods

Now that I've said that, let me explain why I am calling out Trader Joe's Kosher Brisket in this recipe.  Kosher meat and chicken have a lot of flavor because the meat is soaked in water for a half hour, then placed on special salting tables where it is salted with coarse salt on both sides for one hour.  Then the meat or chicken is rinsed.

You can make this recipe with a regular cut of beef brisket, but you will want to salt the outside before you saute and brown the brisket.

So when you read this recipe through you will see how simple the ingredients are.

Trader Joe's Kosher Beef Brisket using the Instant Pot (6-in-1 Programmable Pressure Cooker)

Trader Joe's Kosher Brisket (rinsed and patted dry) 1 1/2 or 2 pound
or same amount of a regular kosher brisket
2 tbsp oil (or margarine such as I can't believe it's not butter)
1/2 tsp fresh ground pepper corns
1 medium sized Spanish onion
5 red potatoes (or any other potatoes you have)
1 cup baby carrots
1- 1/2 c Pacific Organic free range chicken broth (low sodium)

I am using the Instant Pot (6-in-1 Programmable Pressure Cooker) for this recipe.  http://instantpot.com/


Put the Instant Pot on the saute setting.

Put in 1 tbsp of the oil (or margarine) and caramalize the onions.  Once golden, remove from pot, put in bowl, and set aside.
If needed add a bit more oil (or margarine).  But keep the Instant Pot on Saute setting.

Rub the freshly ground pepper corns on both sides of the brisket.  Note:  If you are cooking a regular brisket add salt as well (I recommend Kosher salt because the granules are bigger and you have less tendency to over-salt).

Sear brisket on both sides.

Put in carrots, potatoes, and browned onions.  Then pour over the chicken broth.

Switch Instant Pot to Slow Cook and set for 4 hours.

Let slow cooker setting return to normal pressure on it's own.  Then remove vegetables.  Gently lift brisket as it will be falling apart!   Warning!  Your mouth will start to water!

Put the Instant Pot back on saute setting and reduce down the juices to about half.  This will only take a few minutes!

That's it.  Again if using a kosher brisket, there is no added salt.  That is also why I used low sodium chicken broth.


Sunday, April 24, 2011

HUEVOS HAMINADOS OR SEPHARDIC STYLE BAKED EGGS

I get tweets, and more tweets and more tweets every day.  But occassionally I find one I really have to investigate further.  Such was the case with a picture of an egg decorated with a delicate leaf pattern appeared on a retweet by at the Black Star gourmet website.  The original tweet came from http://www.aglaiakremezi.com/articles/general/mediterranean-sephardic-connection-ukrainian-easter-eggs.html.  In the recipe sited she uses an old nylon hose.  But the recipe she was talking about was from her mother and she made them for Easter. 

It piqued my curiousity about Sephardic Jewish traditions (even though we are Ashkenazi Jews) and how these egges were used.  I love learning about traditions and foods especially at Passover time.  So I had to start researching, and found the recipe (listed below) on Beth Israel Congregation (in Bath, Maine) website.  The Beth Israel congregation had a great recipe for Sephardic Baked Eggs.  It was on the page entitled Passover Recipes.

That Friday I was able to make a quick sojourn to our local East York Market where I hoped I would find the required onion skins at Dorothy's stand.  Dorothy is one of my favorite ladies at the East York Market.  She's been with this wonderful farmers market for more than 50 years now.  She's missed a few Fridays, most recently because she broke her ankle. But usually I can find her smile and hug in her usual spot. 

A few years back I had noticed that she had bags of onion skins for sale at her stand.  "What do you use those for?" I asked Dorothy.  "We color our eggs with onion skins" she explained.  At the time I had just tucked that little tidbit in my mind.  But when I saw the recipe I knew just where to do for onion skins!  Sure enough, she had bags of the dried onion skins.  I picked up a bag for $1.00 and told her I would let her know how my recipe came out. 

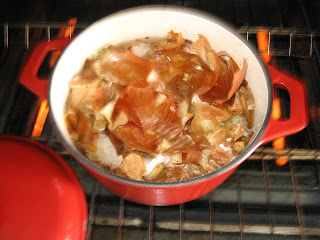
I had also recently been to a hot sale at our local Salvation Army and found one of those great enameled cast iron dutch ovens for $15.00 (think Le Crusett knockoff at a fraction of the cost!).  So with the onion skins from Dorothy, the right pot, and a few other ingredients listed in the recipe I found I was ready to try out Sephardic style Baked Eggs for our Seder this year! 


HUEVOS HAMINADOS OR SEPHARDIC STYLE BAKED EGGS
by Denise Tepler

18 eggs
brown skins from 10 to 15 onions
1/2 cup ground coffee
4 tablespoons olive oil
1 teaspoon salt
heavy covered oven-proof pan such as a cast-iron Dutch oven

Cover bottom of pan with onion skins. Lay whole eggs on top of skins and cover with another layer of skins. Sprinkle with coffee and salt. Drizzle oil over all. Fill pan with water to cover ingredients. Put lid on tightly and place in 250° oven to bake for at least 8 hours or overnight.

Traditionally served at a Sabbath Desayuno meal or on Passover on a platter with chunks of feta cheese and olives.


I placed a cilantro leaf on several eggs.  Then wrapped each one in one of my hops bags.  I keep at least a dozen hops bags in my beer making supplies that I buy at Mr. Steve's here in York, PA.  You'd be surprised all the uses I find for them! 


I put another layer of onion skins on top of the coffee grounds, salt and then drizzled on the olive oil.  Then covered with water just like the recipe says. 


Eight hours later, I have one messy pot.  But the eggs came out beautiful! 


The all brown one was one I didn't put a leaf on, just put it down inside without a leaf or a hops bag. 


I couldn't resist having one for breakfast with cheese and olives!  Pure heaven.  The eggs are more tender than boiled eggs and have a slightly different taste. 

This is a great recipe and I can easily see it being baked with cholent in the oven for Saturday lunch!  Ummm Ummmm!  I can also see it being a great egg recipe for any meal to wow our guests! 
BTW...Ken loves them! 

Tuesday, April 5, 2011

Puttanesca Sauce with penna

About once a week or two weeks I have to have my freshly made Puttanesca sauce.  This is a quick and easy dinner that is so flavorful!

Let me explain that first of all I don't really a lot of red sauce with my pasta.  Oh, I make a great one and even can it up for my husband, Ken.  He loves it.  But once I made a fresh Puttanesca sauce my opinion changed! 

I'll even make extra and have it on a good piece of my homemade ciabatta bread.  I took some of that extra down to Denise, my neighbor Waneta's daughter, one day.  She was up from Baltimore visiting her mom, and I had a feeling she'd like it.  Of course Denise loved it!  I didn't give any to Waneta to try because I make my Puttanesca sauce with anchovy paste and she really doesn't like that.  LOL.  But Waneta is a great neighbor and buys it for me if I ask her to pick it up!  

Denise asked me for the recipe and I had to laugh...I don't use one!  So the next time I made it I wrote it down for her, and I documented with pictures! 

So this one's for you Denise.  Now get Drew to make it for you and you'll be set for a romantic evening! 


3-4 Tbsp olive oil
6-8 big vine ripened tomatoes, or about a dozen small ones, chopped (I don't even peel them)
1/8 tsp kosher salt
1/8 tsp red pepper flakes
3 cloves garlic or shallots (finely chopped)
1/4 cup chopped ripe olives (make sure to throw a few kalamati olives in), seeded and chopped
1/2 to 1 c good dry red wine (preferably homemade or good brand of commercial Chambourcine)
1 Tbsp Berkley and Jensen capers (from BJs warehouse club)
1 squirt Roland Anchovy paste

Put the olive oil in a large skillet, and bring to medium heat.   Add the tomatoes, garlic (shallots), kosher salt, red pepper flakes and cook the tomatoes until soft.  Be sure not to over salt.  Remember you'll be adding olives, capers and anchovy paste with salt in them.  Add red wine, and continue cooking. 


Add chopped olives, capers and anchovy paste.  Cook for another 5 minutes. 
 Pour over penna or spaghetti. 


Sprinkle with freshly grated (on microplane side of cheese grater) parmesan cheese.  You don't see the cheese in this picture because I wanted the sauce to show. 

OK, Denise now it's your turn.   Let me know how it tastes!  BTW, do you know the story behind Puttanesca sauce?  Hmmm very interesting! 

Thursday, January 6, 2011

Corn Muffins using Dannon Light & Fit Vanilla Non-Fat Yorgurt

My husband, Ken, loves corn muffins and had been hinting for a few days about them.  Then one morning I came downstairs and there was a recipe for corn muffins on the top liner from the Dannon Light & Fit yogurt container he had opened. 

I looked it over and left it on the counter, wondering if he forgot to throw it in the trash or if it was an out-and-out hint that he wanted me to make them.  Finally a few days later our schedules gave us enough time together for me to ask.  He said it might be a good one to try.  "OK.  I'll give make them, but I wonder about them being too sweet," I replied.

I'm a gal who loves plain yogurt,  not flavored sweetened yogurt.  Ken loves vanilla yogurt though.  The advantage with Dannon's Light & Fit is that it is not sweetened with sugar, so it fits into Ken's diet. 

The recipe is simple, quick, and surprisingly not too sweet.  The yogurt makes the corn muffins moist, which is a good thing!  Also even when heated in the microwave they come out nice and soft, not tough. 

When I posted a comment and picture on my Facebook page I had several requests for the recipe.  So here it is!

 Corn Muffins from Dannon Light & Fit Non-fat Yogurt
1 c yellow cornmeal
1 c all-purpose flour (I generally only use King Arthur)
1/2 c granulated sugar (I used 1/4 c sugar and 1/4 c Splenda granulated)
1 tsp baking powder
1 tsp baking soda
1/4 tsp salt
2 large eggs
1-1/4 c Dannon Light & Fit Vanilla or Strawberry nonfat yogurt
1/4 c canola oil

Preheat oven to 375 degrees.  Ligghtly great or line twelve 2" muffin tins.  I used my silicone ones...but even on those you still need to spray Pam.

In a bowl whist together dry ingredients.  In another bowl whisk together eggs, goygurt, and oil.  Then add the yogurt mixture to the flour mixture, and stir the batter until it is combined. 

Divide the batter among the muffin tins , and bake the muffins for 20 minutes or until a tester comes out clean.  Let the muffins cool in the tins on a rack for 3 minutes.  Then turn them out onto a rack and let them cool completely...Yeah right like that's gonna happen in my house!  Let them get cool enough to handle, split and slather with butter.  That's what we do!


Next time I won't put them in the muffin tins...too much cleaning!  Instead I'll just bake the batter in my cast iron skillet and then just slice wedges when it's cooled enough to serve. 

If any of you try this recipe with the strawberry yogurt please let me know...would love to know what you think! 


Sunday, August 8, 2010

Broccoli four leaf clover buns...no scratch that... Zucchini, onion, rosemary & garlic bread

I am diverting from my usual format for the HBin5 Bread braid which was scheduled for August 1st.  So since I am posting this on August 8th...yes, I am late.  My inspiration for swerving from my usual format for our bread braids is primarily time and free thinking writing.  I finally had the time this morning to make read the other blogs from our HBin5 group and the time to compare what I had seen on tv recently.  Hope you enjoy taking the trip with me. 

I love baking bread, as anyone who reads this blog knows, and particularly love making no-knead breads from Healthy Bread in 5 minutes a Day by Zoe Francois and Jeff Hertzberg.  But theirs is not the only no-knead bread recipes or cookbooks out there. 

Yesterday I was watching Chuck's Day Off on the new Cooking channel.  Chuck is actually Chuck Hughes multitalented owner and chef of Montreal hot spot Garde Manger. 

Chuck's Day off on the Cooking channel
Chuck Hughes bio

He featured a no-knead bread recipe that used a bit of a different technique that intrigued me enough to give it a go.  The ingredients were pretty much the same though.  He plopped the first rise dough ( he only gave it 50 minutes!) into bread pans gently so as to not deflate the dough and baked it at 350 degrees for 50 minutes.  Usually I put the first rise dough (about 2 hours) into the frig for at least a day, and sometimes wait up to five days to use it based on my time constraints.  Additionally when I bake the dough according to instructions in ABin5 or HBin5 I bake it at 450 for 30 minutes and add water to a pan in the oven at the beginning of the baking to steam the bread and give it a very crunchy crust.. 

So I decided this morning to incorporate several different things.  As stated earlier I had missed the assignment date of August 1st for the latest HBin5 bread braid, due to time constraints.  The assignment was four leaf clover broccoli and cheddar buns found on page 174.  But Danielle, who did get the assignment done, pondered using zucchini in the dough instead.  She had also used all purpose flour instead of whole wheat and all purpose flour.  See Danielle's blog here

I decided to make the assignment in the following manner:
  1. still used the HBin5 recipe on page 174 but used all purpose flour only and substituted zucchini instead of broccoli. 
  2. the substitution of zuchhini for the broccoli required an increase of 1 cup of flour.  According to Mary Bell's Complete Dehydrator cookbook, zuchhini is 94% water while broccoli is only 89% water.  That 5% makes a difference to the recipe I found.
  3. also added onions, garlic and a sprig of fresh rosemary (leaves only no stem)
  4. added 1 tsp of dried minced garlic to the flour mixture
  5. instead of putting the dough in the frig after the first rise, I put it into 2 bread pans and baked it for 50 minutes at 350 degrees.
  6. opted for baking the bread in loaf pans instead of forming into dough balls for the buns.  This was primarily because this dough is very loose and wet if it hasn't been refrigerated.  That would not be a bad thing if making a pizza by the way, but I wanted loaves of bread from this dough, not buns.
  7. did not use a waterbath in the oven
  8. used eggwash on the dough after sprinkling white and black sesame seeds on the top
  9. instead of cutting the dough with a serrated knife, used scissors to cut into the dough after putting seeds and eggwash on top
  10. did not use steam in the oven
The recipe calls for cooking the broccoli for only about 4 minutes. I found I needed to cook the mixture of zucchini, onions and rosemary about twice that amount of time.


Once I had it cooked I let it cool a bit, then pureed it and then let it cool again before adding to the flour, salt and yeast mixture. This was due to knowing the mixture was still too hot and would have killed the yeast. Even though I had added the 2 3/4 c of cool water to the veggie mixture it was still too hot and definitely needed to be cooled more to room temp. I was still worried about it being too hot so once I had everything mixed together (remember this is no knead) I left the plastic wrap off the top to let the heat dissapate from the dough more.
My one mistake was letting the dough rise for two hours the way we usually do in the recipes from AB and HBin5.  By letting it rise 2 hours it had risen much higher and had alot of spring in it.  That's usually a good thing...but was difficult to move the dough to the two breadpans! 

As I tried to cut the dough in half to remove it easily I realized my mistake.  I then used a spatula to try to lift the dough out of the bowl in one fell swoop..HA!  I came out with a glob of very stretchy dough with so much stretch that I had to put it back in the bowl and try smaller portions!  It was funny!  It took me 4 "scoops" to get the dough into the first bread pan. 

The rest of the dough went into the second pan a bit easier because I was able to pour it in.  But since I had lost some of the spring in these maneuvers, I decided to let the bread rise again in the pans for about 30 min.  I will say that at this stage the dough smelled wonderful already!

The dough rose beautifully in the pans as you can see in the pic below!


To make sure my bread gets baked thoroughly, I use an ACU*RITE (tm) meat thermometer.  I put the probe in towards the end of the bake.  ACU*Rite has an alarm that I set to 204 degrees and that lets me know when the bread has reached the temp I've set it to. 

I noticed with these breads I had to let them bake for over an hour.  That may be because I'm using bread pans that are larger.  I used the entire 4#s of dough in just two bread pans.  While the bread did not brown as much on the top as I expected, I took it out when internal temp reached the forementioned 204 degrees. 

We needed to get to the gym for swimming so it had to cool longer than I usually let it...come on...who can resist cutting into bread fresh out of the oven.  Sigh, in this case I had to. 


The crumb was excellent and the vegtables' flavor was subtle but definitely there!

This picture does not do justice to the color of the crumb

When we returned I sliced off a nice bit and spread "Lemon Bag Cheese" that I made based on the recipe I found on our HBin5 leader's website.  It's a great recipe and extremely versatile.  In this case I had added fresh basil, rehydrated minced garlic, and sea salt.  For Michelle's recipe click here: homemade lemon bag cheese


Excellent lunch with a bottle of my homemade Hopdevil IPA!  What a life eh? 

To see what others did with their versions of this assignment click here: