Sunday, January 31, 2010


January 1st Bread Braid with HBin5
Assignment: 1 Full recipe Soft Whole Wheat Sandwich Bread, Pgs 92-93
Hamburger or Hotdog Buns, 94-95
1 Loaf Apple Strudel , pgs 277-278
We can make substitutions, but share what and how we substituted with the group in our blogs.
-------------------------------------------------

The first substitution I usually make is swapping the measurements of the whole wheat flour for the all purpose flour.
Whole Wheat Brioche Apple Strudel:
3 c of WWW( white whole wheat) and 4 c of AP (all purpose flour).
Although the recipe in the book calls for 2 ¼ c vital wheat gluten I followed Zoe’s correction and used only ¼ c VWG.

As an experiment I used ½ c applesauce and ¼ c canola oil instead of the ¾ c unsalted butter called for in the recipe.

Since I was making a full recipe of the WW Brioche I decided I would make one loaf in my brioche pan. This was the first time I was able to use it since I bought it! Woohoo! I sprayed it with Pam first and then put in my dough. I really like using the pan since this dough is so soft and loose!


I also made the strudel but put them in loaf pans. When I rolled up my strudel I realized my loaves came out bigger than I wanted for the pans! Best laid plans and all that you know! So I just cut off the ends and put the rounds in small round silicon pans, so it looked like small cinnamon rolls. All of the loaves came out wonderful.


Taking a page from our wonderful leader Michelle, I cut two slices of the regular style brioche and made two open face brie and apple sandwiches for my lunch. I toasted the brioche and placed the warm brie on them, then added the apple rounds that I had slightly cooked in the skillet with a bit of butter, cinnamon and sugar. Yum! A beautiful lunch!

Thanks for the idea Michelle!

I shared the goodies, of course, and people were nuts over the struedel and the brioche. One of my co-workers, Lori, has become one of my favorite testers…she’s like I am, always analyzing what works and what doesn’t in food. When I explained that I had swapped out the butter for the applesauce she was very intrigued. We were both amazed at how tender and moist the crumb was. Not a hint of apple flavor to indicate the swap!

-------------------------------------------------------------------------------------

Soft Whole Wheat Sandwich Bread
4 c WWW (white whole wheat) instead of 5 c WW. I didn’t have any regular WW so used what I had in the cupboard which happened to be WWW

Other than that I baked the bread as instructed. I made, hot dog rolls and hamburger rolls. Ken has had both types of rolls. He waves his hand back and forth when I ask how he likes them. “You’re never going to get me to like that brown flour, Ezzie” he says with a frown. I give up. LOL. I love the soft whole wheat dough, and so does my neighbor, Waneta, so I will keep making it for us. For Ken, I will continue with his favorites, deli rye (ABin5 book) and sourdough.

For some reason I don't have nay pictures of the regular hotdog buns I made. But I do have images of the wrapped hotdog buns. This is my interpretation of the pretzel wrapped hotdogs that seem to be a staple in this area.

Below is the hamburger buns stuffed with pastrami and mustard. Oh yum!
I like this dough so much that I've already made another batch of rolls and loaf sandwich bread from it. And of course, Waneta got a loaf. She loves it!


Worth Reading


Here is a video of Scupper and Snacks playing at one of the parks back in November. One of our dogwalking friends found Scupper's picture in a local new article. Turns out Scupper was the first dog Snacks played with after he was attacked at our local dog park. The article chronicles what Susan, Snacks' human, went through after being bitten while trying to protect Snacks.


It's worth reading the article about what Susan went through, and noting that you always need to get the name and number of the owners of dogs who bite you or your dog!


The article is in my Links titled "Scupper & Snacks".

Tuesday, January 12, 2010

Tuna Stuffed Jalapenos

As I have mentioned before, we cruised from San Diego, CA, to the Panama Canal and then through it on our sailboat, Cadenza. During those 18 months, we captured many wonderful memories both in the camera and in our hearts.

Such is the case with Tuna Stuffed Jalapenos!

When we were stuck in Acapulco for the summer, something you don’t want to experience believe me, we met John. At the time John was a university student planning to be an English teacher. He was also a sailor, as was his dad and his brother. John joined us on Cadenza to learn English, and he helped us sail from Acapulco on down the coast to Panama and beyond.

John

I was always begging John to bring me some of his mother’s recipes so I could learn to make some of his favorite dishes for him, and for us. He never seemed to be able to remember when he would come back from visiting his mother. But one day when we were in a little tienda (store) in Huatulco, he pointed at a can of pickled jalapenos with a big smile on his face. John said they always reminded him of the parties he and his friends had. They would buy a big can of them, and stuffed the jalapenos with tuna fish. At last! I finally had a recipe to work with, and an easy one at that!

When I told Ken about it he decided we would stuff them with his favorite tuna fish recipe. Ken’s tuna fish recipe is one that he and his daughter, Kim, love, but frankly for a long time I did not. But over the years I’ve learned to love it! So he would make the tuna fish and then we would stand around and stuff the jalapenos.

There’s a saying in the cruising community that you have to have 200 tuna fish recipes because that is the one thing you can get reliably almost anywhere on the coasts. So now we had 201 tuna fish recipes!

But we ran into a real shortage of jalapenos problem once we were out of Mexico! Due to the climate conditions and the different cultures and eating habits of those in Central America, it’s almost impossible to find jalapenos! When we were in Costa Rica we really had a problem! Remember I said that John used to buy the big cans of pickled jalapenos? Well, down there you are lucky if you can find even a 6 oz can of them!

In fact one day I came out of the grocery store with a sad expression on my face. John, who was waiting for me, asked what was wrong. “John, they have no jalapenos! “

“NO jalapenos! “ He exclaimed. “Si John, NO jalapenos!” I emphasized!

“Bloody Hell!” He said in a perfect parody of our English friend Alan. I stood there laughing like a loony, as I realized just what a variety of English John was learning!

In Panama I did actually find fresh jalapenos. It was a bit confusing finding them however! We were staying on a mooring ball at the main marina in Bahia Panama awaiting our turn to go through the canal. On the morning radio net I asked if anyone knew where we could find jalapenos, either fresh or canned as we were completely out!

Someone called back letting us know about a grocery store that she knew carried them. She gave us directions and off we went. When we found the store we were delighted! They did in fact have jalapenos and I was willing to pay the exorbitant price to have them! But it was very confusing to be in a store in the Jewish section of Panama that was owned by a Chinese family! On the counter were Israeli papers in Hebrew, local papers in Spanish, and others in Chinese! I was at a loss as to what language to say ‘Thank you!” in!

Ah, good memories and fun times!

The reason I am writing about this today is all Diane’s fault! She is one of my co-workers and has been bugging me since last year to make her some Tuna Stuffed Jalapenos. I brought them to the International Potluck last year and it was a very popular dish.

Just recently I had discovered that our local Wal-Mart was finally carrying cans of jalapenos and I was telling Diane that. So on the way home I picked up a can of them and started in making them right away.

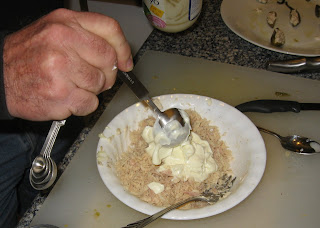
When I asked my husband to taste the tuna mixture, Ken said it wasn’t right. He’s a good guy but very particular about his tuna fish! So he came downstairs from his office and made it for me. Here is his recipe:

1 can (6 ounce size) white albacore tuna fish (any brand)
6 tbsp mayonnaise
3 tbsp Balsamic vinegar
Juice from ¼ lemon
¼ tsp garlic powder
½ tsp celery salt
3 tbsp vinegar
1 pinch dill weed

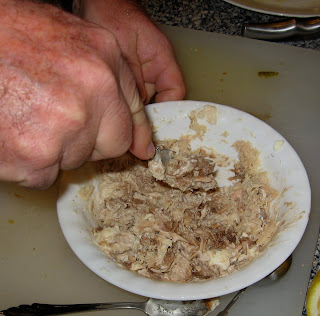
You have to mix all the ingredients together very carefully.


Watch the video to see how precisely Ken does it.

Once mixed, open a 12 oz can of Green Pickled Jalapenos. These should be whole or halved. I am lucky to find the whole ones so I buy those. If you have the whole ones, cut the jalapenos in half lengthwise. With a small narrow spoon scoop out the seeds and membranes carefully.


Then using the same small spoon or even a pastry bag filled with the tuna mixture, stuff the jalapenos. You can garnish them with hot pickled carrots that usually come in the can with the jalapenos, or put a sliver of pimento on top. Or if you want to be fancy, put some fresh dill or capers.

Arrange on a plate and serve. Be sure to have some good beer, or tequila on hand to go with it!


Salud Diane!

Sunday, January 10, 2010

Quiche a la Tomate, Nicoise


After I saw the movie Julie and Julia about Julie Powell cooking her way through Julia Child’s Mastering the Art of French Cooking, I really wanted to read MAFC!  I borrowed a copy from my neighbor Barb after she finally located it after losing it for a month.   It’s the “new” 1970 edition that was reprinted in conjunction with the movie.  In this “new” version Julia often gives instructions for using the new kitchen appliances such as food processors. 

As I was skipping from chapter to chapter I decided to try a few of the recipes before I had to give it back to Barb.  There were two recipes I tried, actually one recipe but it has two components.  

First let me say that I learned about Nicoise salad way back when I was a hostess at a very nice hotel dining room.  I had taken the job because I needed more money to live on than I was making as a receptionist at the Park Central Mall in downtown Phoenix, Az.  

In those days if you worked at any kind of a restaurant they had to feed you if you worked more than 4 hours in a shift.  Since I was so very, very broke, that one meal when I worked there really helped!  Even back then I loved good food, and one of the bonuses I gained was learning about some very tasty dishes.  

At that time I had never had anchovies, nor any type of olive other than green olives stuffed with pimento.  Because all of us at the restaurant had to be able to answer questions about the various dishes, we always had to taste them.  At first blush I was not enamored of anchovies.  They were too salty and too fishy for my taste back then. 

Fast forward 40 some years and now I live with a gourmand who loves anchovies in his spaghetti sauce, his pizza sauce, etc.  Most of us find that our taste buds change over the long years and mine are no exception.  I’ve developed a taste for those salty little fish, and as a result pounced on the Quiche a la Tomate, Nicoise recipe on page 148-149 in MAFC. 

I’ve made quiches in the past but nothing like this one.  My first attempt at making it back in November of 2009 resulted in a dish that drew rave reviews, I just wish I could have tasted it!  I had developed a bad case of GERD and couldn’t handle the tomato in the recipe.  Darn!  But my husband, Ken, plus my neighbor Waneta’s son Don, and neighbor Barb all loved it!  

So, today using my very own new copy of MAFC, I decided to make it again and intended to taste it!  But this time I did one thing different with it that Ken had mentioned the when I first made it.  The recipe calls for 1 egg and 3 egg yolks.  Needless to say that wastes 3 egg whites!  I simply used them for washing my breads that I was making at the time as well.   But this time, at Ken’s suggestion, I beat the 3 eggwhites and folded them into the tomato mixture before pouring it all into the pie shell. 

Speaking of pie shell…I have to say I love Julia’s recipe for piecrust.  It’s the best I’ve made.  After reading her chapter on it (starting on page 139 which is Chapter four, Entres and Luncheon Dishes), I decided to make it in the food processor my mother-in-law handed down to me a few years ago.  Wow!  Was it ever easier and tastier than using my pastry blender and the recipe I had used before!   I will admit that I have to clean up all the food processor pieces, but I am learning that is not too big a task! 

Bea's Cuinisart, an oldie but a goodie!

Once the pie dough has been in the frig over night, or in the freezer for an hour, you roll it out and then move it to a quiche pan or a springform pan which is what I use.  I’m still having trouble with the crust slumping during the partial baking phase, but it tastes so good we don’t care how it looks.  I’ll keep practicing it with this and other recipes and finally get the hang of making it look pretty.  Or, I’ll go ahead and get a quiche pan, now there’s an idea! 

Anyhow, I am not going to put the recipe in here simply because I don’t have time to type the entire thing in and it does have multiple steps.  But I will include the pictures I took during the process and brief explanations about them.

Quiche A La Tomate, Nicoise page 148-149


Start by making your pie dough, and after chilling it prebake it in the oven for 8 minutes.  Remember to dock the bottom!  I put a buttered side down piece of foil in mine and put in a package of beans to help keep it from developing air pocket bubbles.

Make a quick fresh tomato sauce mixture by cooking down some good ripe tomatos with onions.


In the tomato mixture you also add garlic, oregano, salt and pepper.  Cook it down until almost all the juice has evaporated.   The picture below shows how much it had cooked down.   Although Julia says to use a heavy stainless steel pan I used my good old cast iron skillet.


I beat the 1 egg and 3 egg yolks, then added the chopped anchovies (the ones I had were wrapped around capers), oil (including the oil from the anchovy can), tomato paste, oregano, parsley, paprika and cayenne pepper.  I need to add here that I didn't have any fresh parsley which I believe is what she meant.  However, I did have some parsley that I had dehydrated, and I just crushed that with my garden grown and dehydrated oregano.


To all  of this I folded in the tomato mixture.

I beat the 3 egg whites to stiff peaks and then folded them into the tomato, et all, mixture and poured it into the partially baked pie shell.


You can see in this picture how my pie shell slumped in several areas.

 I used oil cured olives that have bits of garlic.  They are delicious in this dish!  You don't need many of these.  The pits are a bit difficult to pry out.  I've found the easiest way is to roll the olive under my chef's knife and "crack" them.  Then  call pull out the pit and use the olive.  Final step is to sprinkle some parmesan cheese over the quiche and drizzle some olive oil on top.


Bake it in a preheated 375 degree oven for 25-30 minutes.  I found I needed to let it cook for an additional 10 minutes.  I am not sure if that was because of the inclusion of the folded in egg whites or not.

About 5 minutes after taken out of the oven, the quiche will slump a bit.  That's to be expected especially with the addition of the egg whites.


Twenty minutes after it came out of the oven, this one last piece is all that was left!   The quiche, a salad and a glass of our homemade Merlot was all that was needed for a great meal!  Ken really likes it with the beaten egg whites folded in.  He said that it had a lighter texture.  Sadly, Don and Barb were not around to second or negate that comment!  LOL.

I won't downplay the work that goes into this dish.  But I will say it is really worth it if you like anchovies, very flavorful olives, and the taste of fresh tomatos!  Bon appetit!  


Saturday, January 9, 2010

Matzah!

Matzah!  Get your homemade Matzah here! 

No, please don’t order matzah from me!  I’m just joking about that…but I did make matzah today from scratch in my own home!  Woohoo! 

Matzah is an unleavened bread that the Jews carried with them when they had to leave Egypt.  Passover, the most observed of the Jewish holidays, commenerating the Exodus from Egypt will start March 29th this year and go for 8 days.  My friends, Judy and Michelle from the HBin5 group, and I decided we would try making matzah, as a side project to March HBin5 Bread Braid. 

I’ve had many brands of matzah over the years, and had been wanting to try to make it for a long time.  I seemed to always miss the matzah making class the Lubavitcher’s give before Passover, so I have been watching YouTube videos on how to make matzah.  There are some great ones videos out there.  Here are three that I particularly liked:


When I looked up matzah recipes on the internet however, I kept finding recipes using matzah, not making it.  Finally I found a site that had exactly what I wanted.  http://judaism.about.com/library/3_howto/ht_makematzah.htm

I particularly like this site because it starts off explaing that you’ll need to put your oven through a full self-cleaning cycle to make it kosher for Passover.  Next it goes into the ingredients needed including special flour called kemach shel matzah shamura which is flour that has been watched from the moment of harvest to the moment of packing to make sure it has not come into contact with any moisture.  While I don’t have access to that kind of flour here in York (not that I am aware of at least), I like knowing these facts! 

I’m going to boil down the process here, but I suggest you do your own research or at least look at the links listed above.  It’s always good to know about the customs and traditions, even if they are not yours. 
  
The basic matzah recipe is as follows.  But first heat your oven to the highest temperature it can get.   The Streit’s matzah factory bakes their’s at 900 degrees.  My oven can only go to 550 degrees, so I heated it up to that. 

1 part water to 3 parts flour.  I used:

1/3 c water
1 cup flour

Mix the two ingredients together, and knead in the flour to a moderately stiff dough.  I found that this made 2 matzahs.  I then flattened it out into a disk (about 4 inches across) by hand first, then put onto my floured counter to roll out with a rolling pin.  I rolled it out like I would piecrust, rotating a quarter turn to get the shape as round as I could.  But because you are supposed to keep the entire process from mixing the flour and water, to taking the matzah out of the oven to under 18 minutes, you have to roll fast! 


Once I had the dough rolled out as thin as I could get it, I docked it with a fork all over.  I will definitely be getting a docker!  A docker is kitchen tool that looks like a torture implement, but actually it puts evenly spaced holes as you roll it over the dough.

http://www.amazon.com/American-Metalcraft-DDCH7755-Ten-Wheel-Casted/dp/B002NYB12M/ref=sr_1_19?ie=UTF8&s=home-garden&qid=1263092202&sr=8-19


Once I had it docked all over, I placed the matzah on the peel and placed it in the oven.  You can also drape it over your rolling pin and just roll it off the rolling pin onto the baking stone.  Because my oven only gets to 550 degrees, I had to bake the first one for a total of 4 minutes.  I found with the third matzah that five minutes was too long and one edge of the matzah was almost burned.

Matzah #1

In one of the videos it says that the matzah is baked for only 15 seconds.  But that is a wood and coal oven similar to a pizza oven.  Again, that type of oven gets much hotter than a home oven can get! 

Since my first one was so successful, I had to make more to make sure I had the hang of it.  Of course the second was a dud!  That’s mainly because I forgot to dock the dough!  LOL.  Like I said, definitely getting a docker! 

Forgot to dock the dough!


Matzahs #3 & #4

Ken really likes the matzah I made, and stated he likes it better than the commercial brands. 

But just like the crazy guys on Myth Busters, I had to take the matzah crackers to the next level.  Couldn’t leave well enogh alone! 

I used to buy a cracker at BJs that I loved but they quit carrying it.  The name on the box said Bakers Bread but it was a crisp, cracker about ¼ inch thick.  It came in two types.  One had sesame seeds on it and one had a mixture of seeds sprinkled on. 

So I decided that I could spend a bit of time adapting the matzah crackers by brushing an egg wash on the dough and then sprinkling on seeds.  I used egg beaters for the egg wash just to see how it would work.  I brushed it on and then sprinkled sesame seeds on it.  Then I docked it.  I made sure to keep enough flour on the counter so I could easily move the dough onto the pizza peel to put it into the oven.  Next I did one with just some sea salt on it.  Then another with sesame seeds and Hawaiin Black salt.  Finally one with sesame seeds and poppy seeds.  All came out great!  I did find that the ones with egg wash really did need to be docked after I put the egg wash on. 


I also found that the crackers with egg wash needed to be put back in the oven for another minute or so, due to the fact that they just weren’t crisp enough.


These crackers came out very good and the recipe is so easy!  I suggest anyone try it.  But if you are going to use them for Passover, be sure to watch some of the videos, read about the time limits and other kashrut considerations. 

Most of all, have fun learning the tradition and ENJOY making your own matzah!

Monsters and Spoon Rolls


The monster was stirring.  I could feel it happening.  It had been 5 days since the monster’s hunger was fed, it needed to feed again!  Driving home from work, I could feel the urge building and building.  But there was nothing to feed the monster, what was I going to do to calm it down?   I didn’t have time to stop and buy what it needed.  So I surpressed the monster until finally it burst forth in a frenzy!  Thank goodness I had made it to BJs in time to pick up 20 pounds of King Arthur all purpose flour because the BAKING MONSTER was lose again!  LOL. 

As I’ve said in previous blogs I go down to Waneta’s and Wayne’s condo, my neighbor’s a few doors down, on Saturday mornings for breakfast.  We have a great time chatting and laughing about the week’s events.  This morning Waneta handed me her latest copy of a magazine called Cappers.  It was open to an article on Homemade Bread the Easy Way by Jean Picard.  Waneta knew I would want to read it since it was about the no-knead method of breadmaking that I use. 

Pointing to the fourth page of the article and a recipe entitled Quick and Easy Spoon Rolls, she explained they had had them awhile back and really grew to love them.  I read the recipe and it was very simple, and in fact reminded me of another recipe that I call “Duffy’s Blender Bread”.   Duffy is a gal I call my Alaska mom.  She in her 90’s now and still doing well.  She has the usual problems of folks in their 90s but a great gal!  She has all kinds of great recipes and her quick and easy blender bread is one of my favorites. I'll go over that one in a later blog post.   But I will say that after making the spoon rolls, Duffy’s Blender Bread is not as wet and sticky and the Spoon rolls are. 

Anyhow, Waneta and I chatted some more and then got back to the spoon bread rolls.  I knew what was coming when I told her it would be a good recipe for her to make.  I saw the look on her face and waited for it to come out of her mouth.  Wait for it, wait for it…”well, I think it’s a good for Ezzie to try for me!”  I laughed and told her I KNEW she was going to say that.  And of course she was right.  I had to try the recipe…for her.  LOL. 

The recipe called for the following ingredients:
3 ¾ packed cups unbleached all-purpose flour
¼ c sugar
2 ¼ tsp instant yeast (or use 1 package)
1 ¼ tsp salt
2 c water
½ c unsalted butter
1 large egg

Into a large bowl I put the dry ingredients, then melted the butter and let it cool, then added it to the warm water.  The recipe says to heat them together on the stove until the water and butter mixture reaches between 120 and 130.  I actually got it a bit too warm, so I sat it outside on the porch for a few minutes in the 30 degree weather.  That cooled it down quickly! 

Next I beat the egg, just a bit, then mixed the liquids in with the dry ingredients.   Once blended I covered with plastic wrap sprayed with Pam and set aside to rise.  As you can see from the picture below it is a very wet and sticky dough.  


My kitchen is pretty cold so it took about and hour to double in size instead of the 35-40 minutes stated in the recipe. 


Once it is doubled in size, stir the dough down, and fill well-greased muffin cups 3/4 full.  Let the dough rise again until it’s risen to the tops of the cups.  Now the recipe says to leave them uncovered during this part of the rise.  I did for part of the time.  I think it’s not a problem to leave it uncovered for the entire 20-30 minutes it takes to rise in the muffin cups because the dough is still very wet. 

During the last 15 minutes of the rise heat the oven to 400 degrees. 

Bake 20 minutes or until they are golden brown.  I must say they round up beautifully!  Once out of the oven, wait five minutes before you remove them from the muffin pans. 


I took them down to Wayne and Waneta and they were thrilled.  Even though they had just eaten dinner, they had to sit down and have a roll each. 


The roll is like a cross between a muffin texture and a roll.  It has the big holes characteristic of the no knead breads, but the butter in it gives it a real softness. 


I told Waneta that it’s definitely a recipe she can do.  “Yeah, I could.  But I like it when you make them Ezzie!”   We all laughed.  I told her I’ll keep making them for her!  


One final word from Waneta.  "Mardel, you need to try this!"

Sunday, January 3, 2010

January 15th Bread Braid with HBin5

It is the start of our Healthy Bread in 5 Minutes a Day assignments! We were to do a full Master Recipe on Pages 53-59. With that dough we were to make
1 "regular" loaf,
1 Epi or Wreath shaped bread ( pgs 71-73), &
1 batch of crackers (pgs 233-234).
We can make substitutions, but need to share that with the group in our blogs.
-------------------------------------------------------------
The first substitution I made was swapping the measurements of the white whole wheat flour for the all purpose flour. As I have mentioned before in my blogs, Ken doesn't like whole wheat, in fact he equates it to sandpaper! So unless I don't plan to give him any of the bread I lighten up on the whole wheat. I used:
2 c of WWW( white whole wheat) and 2 c of WW (whole wheat),
&
3 and 1/2 c AP (all purpose) flours.
I also increased the kosher salt from 1 to 1 1/2 tbsp,
&
added 1/4 honey.
I'm anxious to see how everyone did, especially with their crackers!
--------------------------------------------------------------------------------------
For the regular loaf I flattened out my dough and sprinkled it with a cinnamon and splenda mixture, and cran raisins. Then I rolled it up like a log, pinched the seam and ends to seal them and set them in a loaf pan to rise. That loaf came out looking great as you can see in the picture below and best of all Ken loves it! Matter of fact he ate 4 slices and didn't know it had whole wheat in it! LOL.


Next I tackled the Epi. While this is a shape to make me sigh with delight, I had not attempted it previously. Being a bit nervous about it, I looked up the Artisan Bread in 5 Minutes a Day website to see if they had more pictures on how to do it. I wasn't seeing any that really helped so next I viewed a video on YouTube to get a better idea of how it's done. Then I made my basic baguette shape as seen below.


I have had problems before with my baguettes spreading too much, even when making the envelope shape first. Usually I flatten out the dough and then roll it tightly which works better. But this time I decided to try supporting the sides like I've seen in the King Arthur Baking book that I have. In KAB book they show that the shape is formed by placing the formed dough onto a floured towel that has a stiffness to it, then folding a section of the towel up on each side to support the baguette. I didn't have any of that material type towel, so I used a rolling pin on one side and my loaf pan (with the cran-raisin dough in it) on the other side.


Once the dough rose enough I made the scissor cuts at a very shallow angle as the instructions say and the video showed. I was a little concerned that the shape wouldn't come out right, so reshaped a few ends with my fingers. Just before baking I sprinkled sesame seeds and poppy seads on one of the loaves, but left the other plain just to see how they came out.


I was extremely pleased with the results! The only thing I would say is the next time I make them I will make the baguette bigger, I'd like to have all loaves with full size "leaf-buns" instead of half size.


Finally I started on the crackers. I've made crackers many times, but usually with dough that is stiffer. First I tried rolling out the dough on the floured counter. I sprinkled the dough with Penzey's Southwest seasoning. When I went to remove the cracker sections of dough I ran into a problem. The dough stretched completely out of shape! I tried removing the dough with the dough scraper and that was even worse.


I was having more and more trouble with losing the shapes, so I finally just scraped up all the dough and kneaded it together for a minute. I formed it into a round boule and flattened it out. Then I sprinkled it with a four cheese Mexican cheese blend, rolled it into a log and set it aside to rise. When baked it came out very good with just enough flavor from the Penzey's Southwest seasoning!


I tried once more with the crackers. This time I rolled out the dough onto a silicon mat, sprinkled the same seasoning on and then using my dough scraper I cut it into squares. I transferred the entire mat into the oven and placed it on my baking stone. I had rolled the dough as thin as I could and docked it all over with a fork, but you can see how the crackers still puffed up. I found that most of the "crackers" were not to my liking. They were too puffed up. Even after cooling for 1/2 day I found I still didn't like the puffiness and ended up throwing half the batch out and only keeping the really crisp ones.


As I've stated before, I love to share my baking and cooking with friends, neighbors and associates. In this case I took down the biggest loaf of Epi to Carla. She works at our favorite Batteries Plus and has helped us with batteries on a number of our techy devices. Most recently she had one of the guys replace the batteries in my Scooba. While talking to her that time I explained I really needed the Scooba working to help clean the kitchen floor after my baking exploits. We talked about breads and I found out that Carla loves whole wheat bread! To make sure the Scooba worked before I picked it up, they ran it over part of the floor in the shop. That was all it took to convince her she should get one for her mother in the near future!

She loved the Epi as you can see by her smile in the picture!