Sunday, April 24, 2011

HUEVOS HAMINADOS OR SEPHARDIC STYLE BAKED EGGS

I get tweets, and more tweets and more tweets every day.  But occassionally I find one I really have to investigate further.  Such was the case with a picture of an egg decorated with a delicate leaf pattern appeared on a retweet by at the Black Star gourmet website.  The original tweet came from http://www.aglaiakremezi.com/articles/general/mediterranean-sephardic-connection-ukrainian-easter-eggs.html.  In the recipe sited she uses an old nylon hose.  But the recipe she was talking about was from her mother and she made them for Easter. 

It piqued my curiousity about Sephardic Jewish traditions (even though we are Ashkenazi Jews) and how these egges were used.  I love learning about traditions and foods especially at Passover time.  So I had to start researching, and found the recipe (listed below) on Beth Israel Congregation (in Bath, Maine) website.  The Beth Israel congregation had a great recipe for Sephardic Baked Eggs.  It was on the page entitled Passover Recipes.

That Friday I was able to make a quick sojourn to our local East York Market where I hoped I would find the required onion skins at Dorothy's stand.  Dorothy is one of my favorite ladies at the East York Market.  She's been with this wonderful farmers market for more than 50 years now.  She's missed a few Fridays, most recently because she broke her ankle. But usually I can find her smile and hug in her usual spot. 

A few years back I had noticed that she had bags of onion skins for sale at her stand.  "What do you use those for?" I asked Dorothy.  "We color our eggs with onion skins" she explained.  At the time I had just tucked that little tidbit in my mind.  But when I saw the recipe I knew just where to do for onion skins!  Sure enough, she had bags of the dried onion skins.  I picked up a bag for $1.00 and told her I would let her know how my recipe came out. 

I had also recently been to a hot sale at our local Salvation Army and found one of those great enameled cast iron dutch ovens for $15.00 (think Le Crusett knockoff at a fraction of the cost!).  So with the onion skins from Dorothy, the right pot, and a few other ingredients listed in the recipe I found I was ready to try out Sephardic style Baked Eggs for our Seder this year! 


HUEVOS HAMINADOS OR SEPHARDIC STYLE BAKED EGGS
by Denise Tepler

18 eggs
brown skins from 10 to 15 onions
1/2 cup ground coffee
4 tablespoons olive oil
1 teaspoon salt
heavy covered oven-proof pan such as a cast-iron Dutch oven

Cover bottom of pan with onion skins. Lay whole eggs on top of skins and cover with another layer of skins. Sprinkle with coffee and salt. Drizzle oil over all. Fill pan with water to cover ingredients. Put lid on tightly and place in 250° oven to bake for at least 8 hours or overnight.

Traditionally served at a Sabbath Desayuno meal or on Passover on a platter with chunks of feta cheese and olives.


I placed a cilantro leaf on several eggs.  Then wrapped each one in one of my hops bags.  I keep at least a dozen hops bags in my beer making supplies that I buy at Mr. Steve's here in York, PA.  You'd be surprised all the uses I find for them! 


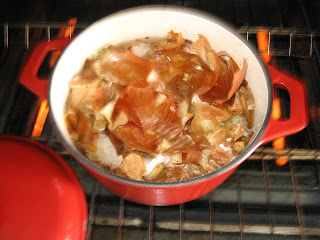
I put another layer of onion skins on top of the coffee grounds, salt and then drizzled on the olive oil.  Then covered with water just like the recipe says. 


Eight hours later, I have one messy pot.  But the eggs came out beautiful! 


The all brown one was one I didn't put a leaf on, just put it down inside without a leaf or a hops bag. 


I couldn't resist having one for breakfast with cheese and olives!  Pure heaven.  The eggs are more tender than boiled eggs and have a slightly different taste. 

This is a great recipe and I can easily see it being baked with cholent in the oven for Saturday lunch!  Ummm Ummmm!  I can also see it being a great egg recipe for any meal to wow our guests! 
BTW...Ken loves them! 

Tuesday, April 5, 2011

Puttanesca Sauce with penna

About once a week or two weeks I have to have my freshly made Puttanesca sauce.  This is a quick and easy dinner that is so flavorful!

Let me explain that first of all I don't really a lot of red sauce with my pasta.  Oh, I make a great one and even can it up for my husband, Ken.  He loves it.  But once I made a fresh Puttanesca sauce my opinion changed! 

I'll even make extra and have it on a good piece of my homemade ciabatta bread.  I took some of that extra down to Denise, my neighbor Waneta's daughter, one day.  She was up from Baltimore visiting her mom, and I had a feeling she'd like it.  Of course Denise loved it!  I didn't give any to Waneta to try because I make my Puttanesca sauce with anchovy paste and she really doesn't like that.  LOL.  But Waneta is a great neighbor and buys it for me if I ask her to pick it up!  

Denise asked me for the recipe and I had to laugh...I don't use one!  So the next time I made it I wrote it down for her, and I documented with pictures! 

So this one's for you Denise.  Now get Drew to make it for you and you'll be set for a romantic evening! 


3-4 Tbsp olive oil
6-8 big vine ripened tomatoes, or about a dozen small ones, chopped (I don't even peel them)
1/8 tsp kosher salt
1/8 tsp red pepper flakes
3 cloves garlic or shallots (finely chopped)
1/4 cup chopped ripe olives (make sure to throw a few kalamati olives in), seeded and chopped
1/2 to 1 c good dry red wine (preferably homemade or good brand of commercial Chambourcine)
1 Tbsp Berkley and Jensen capers (from BJs warehouse club)
1 squirt Roland Anchovy paste

Put the olive oil in a large skillet, and bring to medium heat.   Add the tomatoes, garlic (shallots), kosher salt, red pepper flakes and cook the tomatoes until soft.  Be sure not to over salt.  Remember you'll be adding olives, capers and anchovy paste with salt in them.  Add red wine, and continue cooking. 


Add chopped olives, capers and anchovy paste.  Cook for another 5 minutes. 
 Pour over penna or spaghetti. 


Sprinkle with freshly grated (on microplane side of cheese grater) parmesan cheese.  You don't see the cheese in this picture because I wanted the sauce to show. 

OK, Denise now it's your turn.   Let me know how it tastes!  BTW, do you know the story behind Puttanesca sauce?  Hmmm very interesting! 

Thursday, January 6, 2011

Corn Muffins using Dannon Light & Fit Vanilla Non-Fat Yorgurt

My husband, Ken, loves corn muffins and had been hinting for a few days about them.  Then one morning I came downstairs and there was a recipe for corn muffins on the top liner from the Dannon Light & Fit yogurt container he had opened. 

I looked it over and left it on the counter, wondering if he forgot to throw it in the trash or if it was an out-and-out hint that he wanted me to make them.  Finally a few days later our schedules gave us enough time together for me to ask.  He said it might be a good one to try.  "OK.  I'll give make them, but I wonder about them being too sweet," I replied.

I'm a gal who loves plain yogurt,  not flavored sweetened yogurt.  Ken loves vanilla yogurt though.  The advantage with Dannon's Light & Fit is that it is not sweetened with sugar, so it fits into Ken's diet. 

The recipe is simple, quick, and surprisingly not too sweet.  The yogurt makes the corn muffins moist, which is a good thing!  Also even when heated in the microwave they come out nice and soft, not tough. 

When I posted a comment and picture on my Facebook page I had several requests for the recipe.  So here it is!

 Corn Muffins from Dannon Light & Fit Non-fat Yogurt
1 c yellow cornmeal
1 c all-purpose flour (I generally only use King Arthur)
1/2 c granulated sugar (I used 1/4 c sugar and 1/4 c Splenda granulated)
1 tsp baking powder
1 tsp baking soda
1/4 tsp salt
2 large eggs
1-1/4 c Dannon Light & Fit Vanilla or Strawberry nonfat yogurt
1/4 c canola oil

Preheat oven to 375 degrees.  Ligghtly great or line twelve 2" muffin tins.  I used my silicone ones...but even on those you still need to spray Pam.

In a bowl whist together dry ingredients.  In another bowl whisk together eggs, goygurt, and oil.  Then add the yogurt mixture to the flour mixture, and stir the batter until it is combined. 

Divide the batter among the muffin tins , and bake the muffins for 20 minutes or until a tester comes out clean.  Let the muffins cool in the tins on a rack for 3 minutes.  Then turn them out onto a rack and let them cool completely...Yeah right like that's gonna happen in my house!  Let them get cool enough to handle, split and slather with butter.  That's what we do!


Next time I won't put them in the muffin tins...too much cleaning!  Instead I'll just bake the batter in my cast iron skillet and then just slice wedges when it's cooled enough to serve. 

If any of you try this recipe with the strawberry yogurt please let me know...would love to know what you think!